I know I haven't updated this in a while but I have not been stitching recently. I have had a lot of different pulls on my time and have had no time for stitching...until now!
Over the past few months I have moved work location from London back to Scotland. I have then been studying like crazy. Two years ago I started a second degree in Astronomy and Planetary Science because I LOVE punishing myself! This has taken the majority of my time. I have had so many assignments due (two on Wednesday!) and I have had to devote myself to studying for the past few months.
But I am back on the stitchy trail. I have started a Beauty and the Beast cross stitch and I will get some pics up soon! I have also joined a cross stitch group on facebook, Cross Stitch and Discuss #2. It's a closed group but anyone can join and it pushes you back into cross stitch!
Well that's all for now but I will be back with WIP pics and updates :)
Monday, 12 May 2014

Saturday, 18 January 2014
Exchange gift!
Quick post today :)

I got the post today and inside was my gift from the 'All that Glitters' exchange.
It is a beautiful coaster featuring a lovely pink butterfly. The butterfly is on sparkly Aida with some lovely metallic thread. You can't quite make thease features out from the pic but it is just adorable.
I really enjoyed taking part in the exchange and I absolutely adore my gift! I have said it before and I'll say it again - take part in an exchange. They are so much fun and it is a great way to stitch for people who will appreciate the time and effort that has gone into the work.
Anyway, I best be going as it is very late. See you next time and stay stitchy :)
Thursday, 16 January 2014
Biscornu Photo Tutorial
Hi guys :)
As you know, I take part in exchanges on www.cross-stitching.com/forum and this month I took part in an exchange called 'All that glitters'. The point of the exchange was to try new things, using threads, fabrics or techniques that you don't often use, and sent the gift to your exchange partner. I decided that I would stitch a biscornu and use beads. Now I have only ever made 1 biscornu before (which turned out ok...not great but ok!) and I have only ever used beads a handful of times, so I thought this was perfect.
So now I am going to go through a picture tutorial and try to make it as simple as possible!
The Tutorial
First you need to stitch your two designs. Remember that you need a front and back piece for this to work. It is in essence a small cushion!

This is a polstitches design. I thought it was very sweet and since my partner didn't like green, I thought it would be perfect for her! (there is a tiny bit of green in the middle, but I am hoping she overlooks it!) The important thing about the design at this stage (particularly if you are adapting it from a pattern yourself) is that the outer edge should have a backstitched border running all the way around it. Each segment should have one stitch; it cannot be long stitch and you can't have your backstitch running over more than one block. These borders are used to put the biscornu together and are very important!
Next you need to trim your design.

You should cut your stitching to approximately 0.6cm. I have cut mine a little bigger here as I like to make sure that there is enough fabric as when you pull your stitching tight later on, it can cause big gaps in the fabric if it is too short (my experience with my first biscornu).
Next thing you need to do is find the centre of your backstitched border on one side. This is where you are going to start stitching and putting the biscornu together.

You find the centre of the border on one piece of stitching and then find the corner of a second piece of stitching as shown above. Now we are ready to put it together.
Secure your thread on the back of your work and bring the needle up at the corner point where you are going to be working. Now you simply pass your needle under the first backstitch to the left of the corner and then pass your needle under the middle stitch on the other piece. Make sure you do not go through the fabric; you are going under the thread only! This should bring the pieces together by one stitch.
You continue this method (whipstitch) all along the first side of the biscornu; going under a thread on your first piece of stitching and under a thread on your second piece of stitching.

When you get to the corner, continue in the same method, just ensuring that the extra fabric is tucked on (what will be) the inside of the biscornu. You can also add beads to the corner of the biscornu at this point or add them later (or not at all, like me!). You need to conitnue in this method all the way round and the sides will start to form.

Continue to stitch the sides and when you have completed the seventh side it is time to stuff it. I did have a picture of this but it has disappeared so you may have to use your imagination!
I fill my biscornu with white polyester toy filling (from sew and so) and used a lot of it to make it quite fat. I then finished sewing up the final side and secured the thread on the inside of the fabric.
The next step is to secure the buttons.

Secure a button to the front of the biscornu (pass the thread through the button a few times to make sure its secure.) Make sure you have long thread for this! Pass the needle through to the other side of the biscornu and attach a button there.

Once the other button is secure, pull the thread tight (so that there is an indentation in the centre of the biscornu) and pass the needle back through to the front of the biscornu. Do this a few time (to make sure that the indentation stays when you let the thread go) and then secure the thread on the inside of the biscornu. The shape should stay and you have a finished biscornu!
If you didn't add beads to the corner before, you can do so now (as you normally would) or you could attach a charm to it as well.
I hope this picture tutorial has been helpful and if you need help with anything, let me know. If there is anything that is unclear, let me know and I will fix it. Sorry one of the pictures didn't work out! I took it last night and it has simply disappeared. One of the wonders of technology!
Anyway hope you enjoyed this and try it yourselves.
See you next time and stay stitchy! :)
As you know, I take part in exchanges on www.cross-stitching.com/forum and this month I took part in an exchange called 'All that glitters'. The point of the exchange was to try new things, using threads, fabrics or techniques that you don't often use, and sent the gift to your exchange partner. I decided that I would stitch a biscornu and use beads. Now I have only ever made 1 biscornu before (which turned out ok...not great but ok!) and I have only ever used beads a handful of times, so I thought this was perfect.
So now I am going to go through a picture tutorial and try to make it as simple as possible!
The Tutorial
First you need to stitch your two designs. Remember that you need a front and back piece for this to work. It is in essence a small cushion!
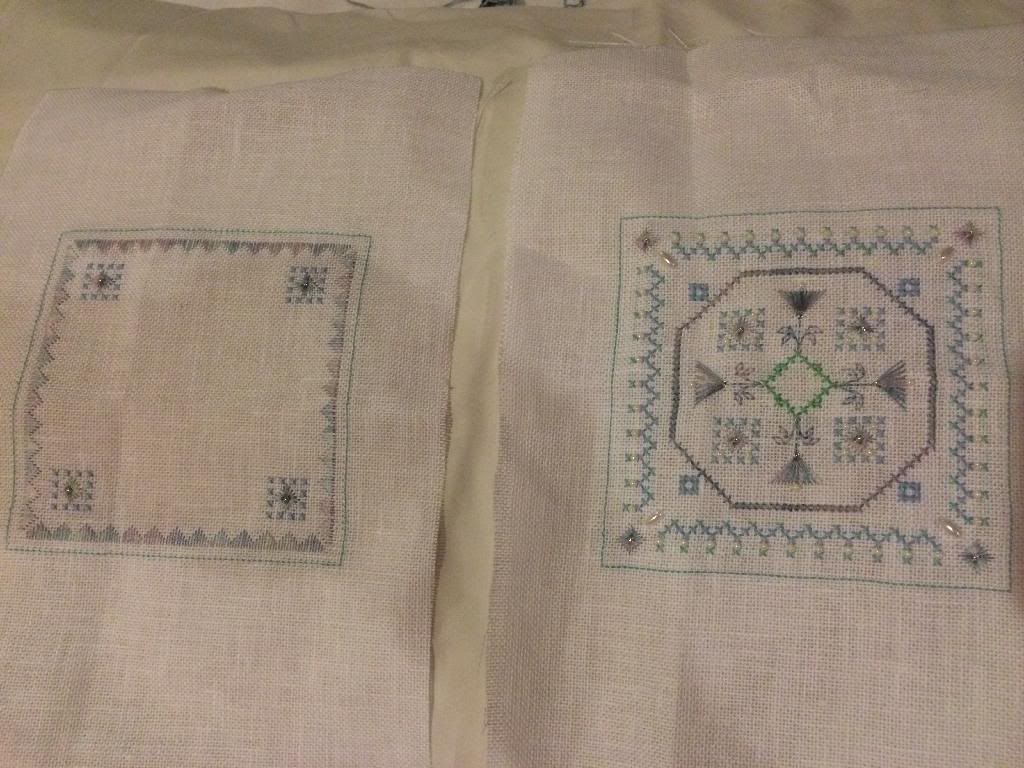
This is a polstitches design. I thought it was very sweet and since my partner didn't like green, I thought it would be perfect for her! (there is a tiny bit of green in the middle, but I am hoping she overlooks it!) The important thing about the design at this stage (particularly if you are adapting it from a pattern yourself) is that the outer edge should have a backstitched border running all the way around it. Each segment should have one stitch; it cannot be long stitch and you can't have your backstitch running over more than one block. These borders are used to put the biscornu together and are very important!
Next you need to trim your design.
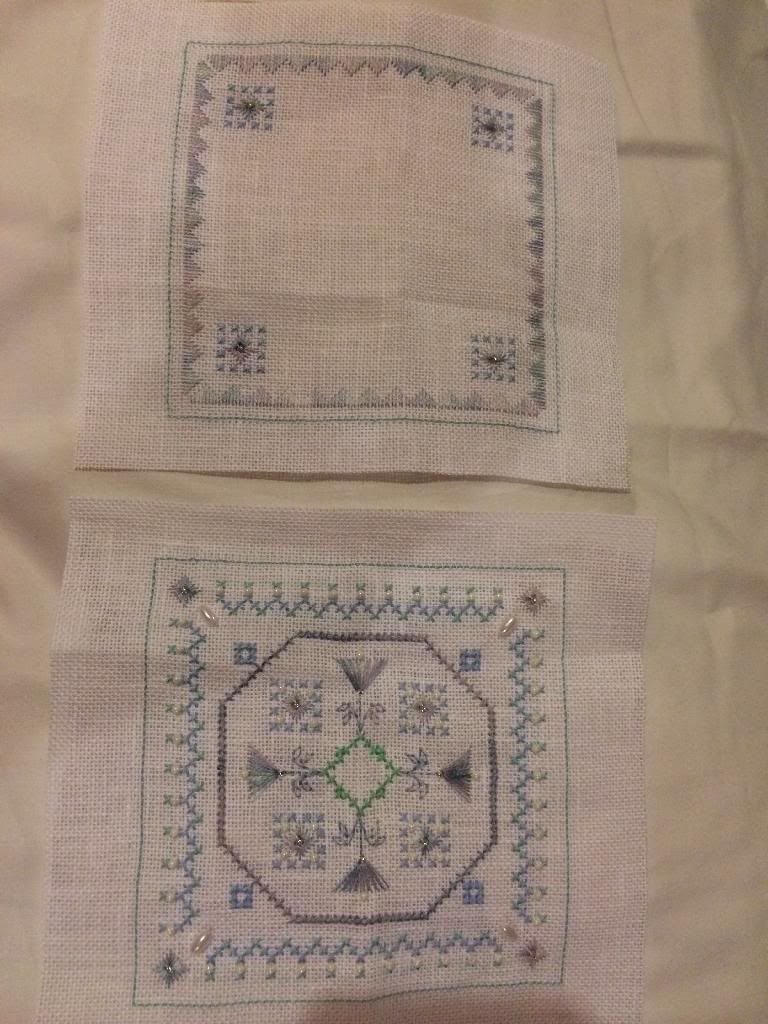
You should cut your stitching to approximately 0.6cm. I have cut mine a little bigger here as I like to make sure that there is enough fabric as when you pull your stitching tight later on, it can cause big gaps in the fabric if it is too short (my experience with my first biscornu).
Next thing you need to do is find the centre of your backstitched border on one side. This is where you are going to start stitching and putting the biscornu together.
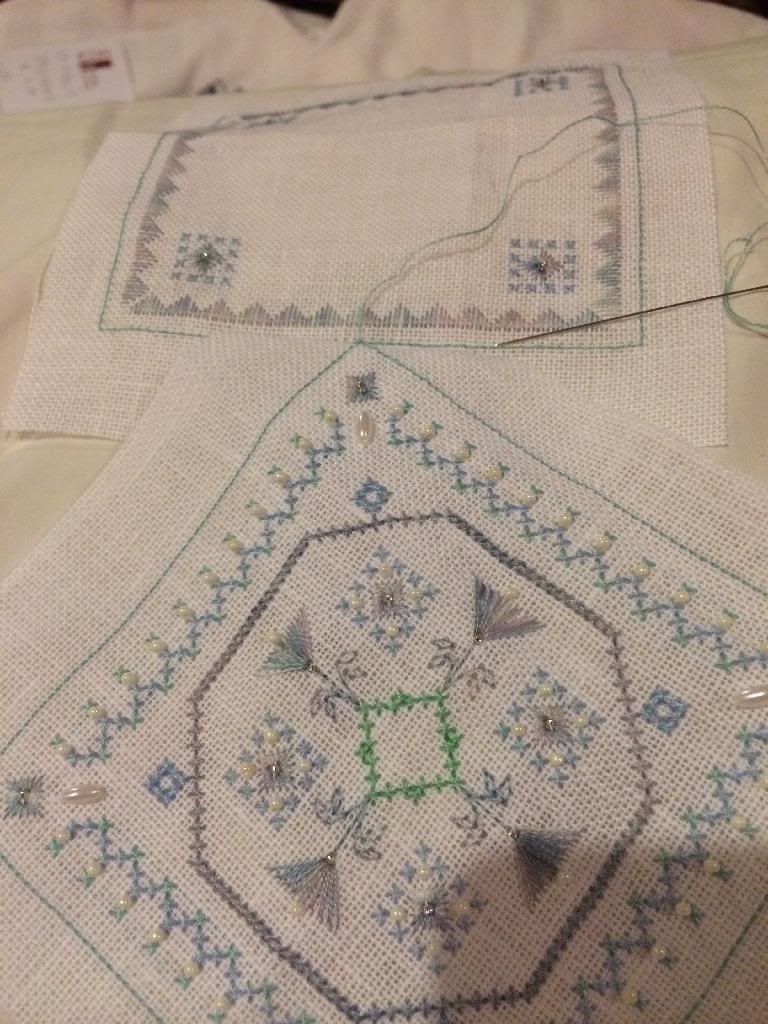
You find the centre of the border on one piece of stitching and then find the corner of a second piece of stitching as shown above. Now we are ready to put it together.
Secure your thread on the back of your work and bring the needle up at the corner point where you are going to be working. Now you simply pass your needle under the first backstitch to the left of the corner and then pass your needle under the middle stitch on the other piece. Make sure you do not go through the fabric; you are going under the thread only! This should bring the pieces together by one stitch.
You continue this method (whipstitch) all along the first side of the biscornu; going under a thread on your first piece of stitching and under a thread on your second piece of stitching.
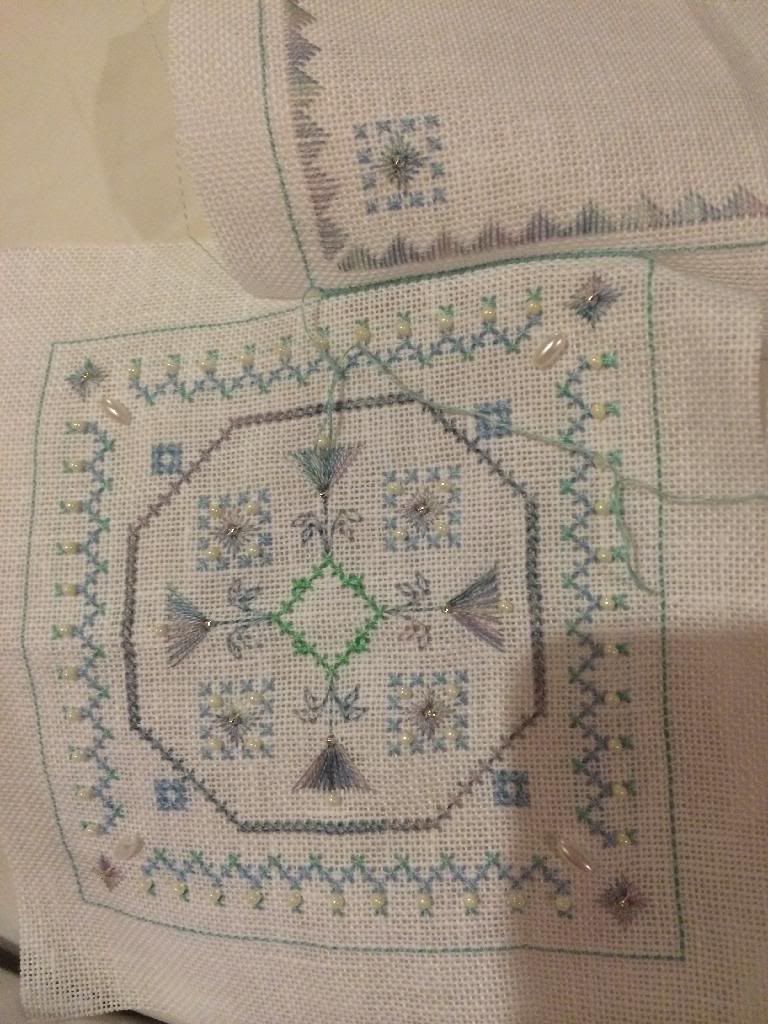
When you get to the corner, continue in the same method, just ensuring that the extra fabric is tucked on (what will be) the inside of the biscornu. You can also add beads to the corner of the biscornu at this point or add them later (or not at all, like me!). You need to conitnue in this method all the way round and the sides will start to form.
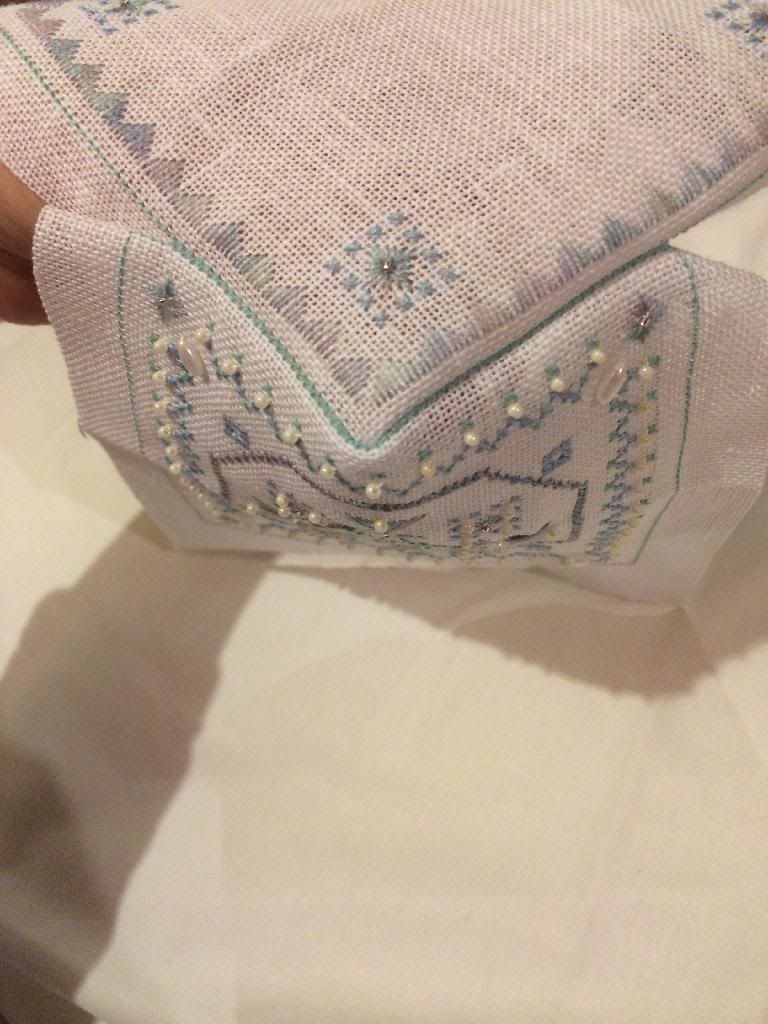
Continue to stitch the sides and when you have completed the seventh side it is time to stuff it. I did have a picture of this but it has disappeared so you may have to use your imagination!
I fill my biscornu with white polyester toy filling (from sew and so) and used a lot of it to make it quite fat. I then finished sewing up the final side and secured the thread on the inside of the fabric.
The next step is to secure the buttons.
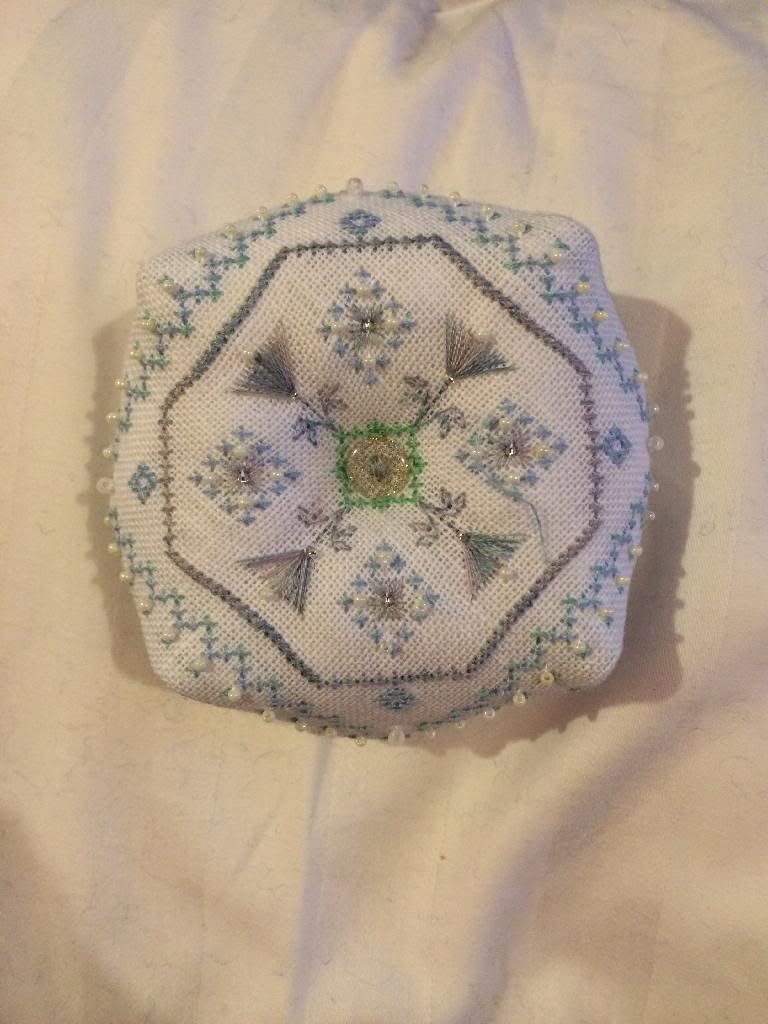
Secure a button to the front of the biscornu (pass the thread through the button a few times to make sure its secure.) Make sure you have long thread for this! Pass the needle through to the other side of the biscornu and attach a button there.

Once the other button is secure, pull the thread tight (so that there is an indentation in the centre of the biscornu) and pass the needle back through to the front of the biscornu. Do this a few time (to make sure that the indentation stays when you let the thread go) and then secure the thread on the inside of the biscornu. The shape should stay and you have a finished biscornu!
If you didn't add beads to the corner before, you can do so now (as you normally would) or you could attach a charm to it as well.
I hope this picture tutorial has been helpful and if you need help with anything, let me know. If there is anything that is unclear, let me know and I will fix it. Sorry one of the pictures didn't work out! I took it last night and it has simply disappeared. One of the wonders of technology!
Anyway hope you enjoyed this and try it yourselves.
See you next time and stay stitchy! :)
Monday, 13 January 2014
Christmas Stitching is a no-go for me!
Hi guys,
I am updating this blog from the plane on a Monday morning!
I haven't updated in so long but I have been so busy with uni (two assignments due in one after the other) and then the holidays. I hope everyone had a good time at the holidays :)
So I am almost finished stitching a biscornu for an exchange I am doing on www.cross-stitching.com/forum. I am going to make another photo assembly tutorial and that will be up soon :).
Before the holiday period I tried stitching a lot...it didn't happen. Normally I am good at Christmas stitching but I only managed one tag and half of a decoration! Very bad on my part but my uni work was so heavy I just didn't have the time. I didn't even use the tag I made!!
Anyway...there will be an update at some point this week and my photo tutorial will be up this week to :)
Hope you enjoy it and stay stitchy :)
Wednesday, 16 October 2013
Massive Haul!
Hi Guys :)
I know I haven't updated this in a couple of weeks but it is because I have been on two holidays in a month! I was away on a girls holiday in Malia and a couples holiday in Paphos. They were excellent but it did not leave me a lot of time to update my blog!
So I have a stitchy make (for an exchange) to show you but i'll save that for another post. Just now I am going to show you the stitchy haul I have accumulated over the past few weeks!

As you can see here it is quite a haul!
Now the thread pack you can see in the bottom right and the card making things you can see in the middle of the picture were both from the same place These were subscription gifts I recieved after subscribing to Cross Sitch Card Shop. The threads are by DMC (my chosen brand) and the card making kit is a Christmas pack, which will be good for the upcoming holiday!
The three mini kits also came as a gift from the magazine subscription.
The large thread bag in the top left came from eBay. This was a mixed lot and I was not sure what I was getting. I managed to get a full bag of threads for approximately £15. This was such a bargain as a skein in the UK can cost up to £1.09.
Everything else in the picture was purchased from a store called Draw Write in Ayr. There is:
I have also purchased a sewing machine! My first. It was an offer on Groupon and I got an LS17 Brother sewing machine for £79. I have never really worked with a sewing machine and I am excited to work with it. If anyone has any tips I would love to hear them! I haven't used one of these since high school!
Anyway, I will be doing an update on my stitching in the next few days, so keep an eye out. Also I have decided to start doing some video tutorials. I will be starting these in the next few weeks and I will upload them on youtube and link them here. So keep your eyes peeled! They will include everything from the basics to move advanced techniques.
Hope you enjoyed this haul post :)
I know I haven't updated this in a couple of weeks but it is because I have been on two holidays in a month! I was away on a girls holiday in Malia and a couples holiday in Paphos. They were excellent but it did not leave me a lot of time to update my blog!
So I have a stitchy make (for an exchange) to show you but i'll save that for another post. Just now I am going to show you the stitchy haul I have accumulated over the past few weeks!
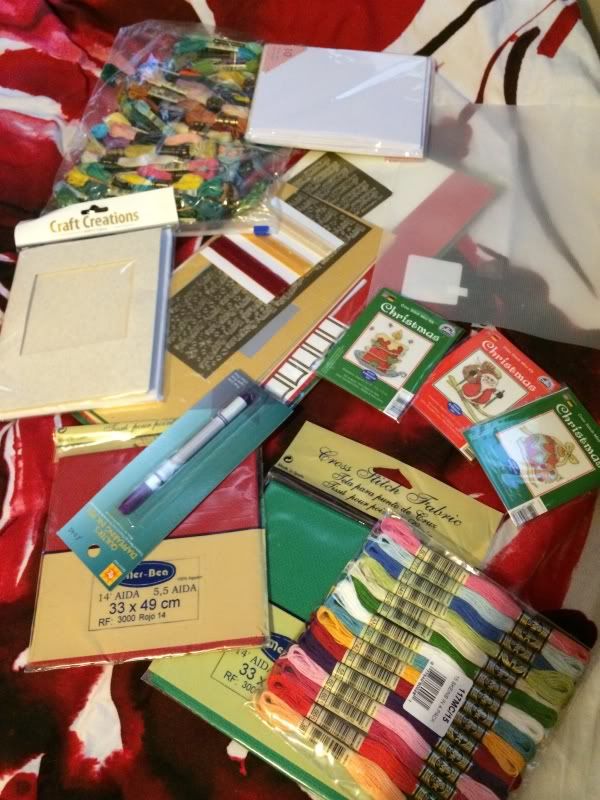
As you can see here it is quite a haul!
Now the thread pack you can see in the bottom right and the card making things you can see in the middle of the picture were both from the same place These were subscription gifts I recieved after subscribing to Cross Sitch Card Shop. The threads are by DMC (my chosen brand) and the card making kit is a Christmas pack, which will be good for the upcoming holiday!
The three mini kits also came as a gift from the magazine subscription.
The large thread bag in the top left came from eBay. This was a mixed lot and I was not sure what I was getting. I managed to get a full bag of threads for approximately £15. This was such a bargain as a skein in the UK can cost up to £1.09.
Everything else in the picture was purchased from a store called Draw Write in Ayr. There is:
- Red 14 ct aida
- Green 14 ct aida
- Plastic canvas (14 ct)
- Two packets of cards
- A pen for marking fabric (perfect for gridding as the ink disappears)
I have also purchased a sewing machine! My first. It was an offer on Groupon and I got an LS17 Brother sewing machine for £79. I have never really worked with a sewing machine and I am excited to work with it. If anyone has any tips I would love to hear them! I haven't used one of these since high school!
Anyway, I will be doing an update on my stitching in the next few days, so keep an eye out. Also I have decided to start doing some video tutorials. I will be starting these in the next few weeks and I will upload them on youtube and link them here. So keep your eyes peeled! They will include everything from the basics to move advanced techniques.
Hope you enjoyed this haul post :)
Thursday, 8 August 2013
Cross Stitch Jargon Buster
A lot of people on forums use cross stitching jargon that newcomers to the craft will not understand. I have been cross stitching for about 15 years and when I joined the online community I had no idea what people were talking about. What's frogging? How do you know if you are stitching confetti? So I thought I'd do a little jargon busting guide that people could look at and get answers to their questions about cross stitching Jargon!
AOY
This stands for the cross stitch patterns by All Our Yesterdays.
Artist Trading Card (ATC)
An artist trading card is a small cross stitch design on a small card, normally the size of a playing card. There are normally exchanges run every month for these types of cards.
Confetti Stitching
This occurs when there are lots of little areas (normally 1-5 stitches) of one colour and you have to keep on changing your thread colour. This often occurs in more detailed work (such as HAED - see below for what this is!). The term confetti comes from the fact that the stitches are spread over the fabric, almost as if confetti had been dropped on the aida.
CSC
This is an abbreviation for the magazine Cross Stitch Crazy.
CSCS
This is an abbreviation for the magazine Cross Stitch Card Shop.
Exchange
This occurs when people get together to exchange cross stitched gifts. This normally follows a specific theme, such as Christmas or Halloween. People send their stitched piece, along with a note, to their partner and they also recieve a gift.
Frogging
Frogging is a term used when a cross stitcher makes a mistake and they are forced to pull out the work that they have done until they fix the mistake. It is called frogging because you have to 'rip out' the work that you have done and it sounds like a little frog. You have to RIP IT out RIP IT out RIP IT out. Sounds quite cute like that!
HAED
This is simply an abriviation of the website Heaven and Earth Design. Heaven and Earth Designs are large, very detailed works that are, in my opinion, absolutely stunning. They are very intricate works and using only whole cross stitches. Would be best for a more seasoned cross stitcher!
www.heavenandearthdesigns.com
ORTs
This is an old cross stitching term and basically means the scraps of thread that are left over from your project. The ORT stands for Odd Random Threads.
Parking
Parking is a unique term in cross stitching but it is not something that everyone does. Parking refers to the way in which people have multiple needles threaded at once. People start stitching in one colour and, when they are ready to move on to another, they 'park' the colour and take up a new needle. Then, when they are ready to come back to the original colour, they can pick it up and start stitching again. This is not a technique I use personally but it can be very beneficial when you have a large project with lots of confetti stitching!
RAK
This is a lovely abbreviation which means Random Act of Kindness. This happens when someone sends you a random gift, out of the blue, that you were not expected. Having been the recipient of a RAK, I can say it is a lovelly act and something that people should do more often.
Round Robin (RR)
A round robin is a type of exchange that is organised on a cross stitching forum or website. In this type of exchange you start stitching a design and then mark out the next sections of the design, depending on how many people are in the Round Robin. Everyone in the exchange will do this. You would then forward on your piece to the next person. At the same time you would recieve another person's stitched piece for you to start on. When you have done your section, you would then pass it on to the next person. In these type of exchanges you always send to the same person and always receive from the same person. In the end your stitched piece will return to you complete!
Stitch Along
A stitch along is again organised on a forum or website. In this a group of people decide to do the same design at the same time. They then post pictures online once a week as a form of encouragement.
UFO
This is another abbreviation for UnFinished Object. This refers to any cross stich project that you have started but have not completed (mainly due to picking up another one!) Unfortunately nothing to do with little aliens! :)
WIP
This is an abbreviation that stands for Work in Progress. This is any project that you are currently working on (note currently working on...otherwuse it's a UFO!) If you are on cross stitching forums, people will generally use this term when showing pictures of their current work.
WOCS
This is an abbreviation for the World of Cross Stitching magazine.
Well I hope this jargon buster has been helpful and will help you break through the jargon and get to the real meaning at the bottom.
Thanks for reading and stay stitchy! x x x
AOY
This stands for the cross stitch patterns by All Our Yesterdays.
Artist Trading Card (ATC)
An artist trading card is a small cross stitch design on a small card, normally the size of a playing card. There are normally exchanges run every month for these types of cards.
Confetti Stitching
This occurs when there are lots of little areas (normally 1-5 stitches) of one colour and you have to keep on changing your thread colour. This often occurs in more detailed work (such as HAED - see below for what this is!). The term confetti comes from the fact that the stitches are spread over the fabric, almost as if confetti had been dropped on the aida.
CSC
This is an abbreviation for the magazine Cross Stitch Crazy.
CSCS
This is an abbreviation for the magazine Cross Stitch Card Shop.
Exchange
This occurs when people get together to exchange cross stitched gifts. This normally follows a specific theme, such as Christmas or Halloween. People send their stitched piece, along with a note, to their partner and they also recieve a gift.
Frogging
Frogging is a term used when a cross stitcher makes a mistake and they are forced to pull out the work that they have done until they fix the mistake. It is called frogging because you have to 'rip out' the work that you have done and it sounds like a little frog. You have to RIP IT out RIP IT out RIP IT out. Sounds quite cute like that!
HAED
This is simply an abriviation of the website Heaven and Earth Design. Heaven and Earth Designs are large, very detailed works that are, in my opinion, absolutely stunning. They are very intricate works and using only whole cross stitches. Would be best for a more seasoned cross stitcher!
www.heavenandearthdesigns.com
ORTs
This is an old cross stitching term and basically means the scraps of thread that are left over from your project. The ORT stands for Odd Random Threads.
Parking
Parking is a unique term in cross stitching but it is not something that everyone does. Parking refers to the way in which people have multiple needles threaded at once. People start stitching in one colour and, when they are ready to move on to another, they 'park' the colour and take up a new needle. Then, when they are ready to come back to the original colour, they can pick it up and start stitching again. This is not a technique I use personally but it can be very beneficial when you have a large project with lots of confetti stitching!
RAK
This is a lovely abbreviation which means Random Act of Kindness. This happens when someone sends you a random gift, out of the blue, that you were not expected. Having been the recipient of a RAK, I can say it is a lovelly act and something that people should do more often.
Round Robin (RR)
A round robin is a type of exchange that is organised on a cross stitching forum or website. In this type of exchange you start stitching a design and then mark out the next sections of the design, depending on how many people are in the Round Robin. Everyone in the exchange will do this. You would then forward on your piece to the next person. At the same time you would recieve another person's stitched piece for you to start on. When you have done your section, you would then pass it on to the next person. In these type of exchanges you always send to the same person and always receive from the same person. In the end your stitched piece will return to you complete!
Stitch Along
A stitch along is again organised on a forum or website. In this a group of people decide to do the same design at the same time. They then post pictures online once a week as a form of encouragement.
UFO
This is another abbreviation for UnFinished Object. This refers to any cross stich project that you have started but have not completed (mainly due to picking up another one!) Unfortunately nothing to do with little aliens! :)
WIP
This is an abbreviation that stands for Work in Progress. This is any project that you are currently working on (note currently working on...otherwuse it's a UFO!) If you are on cross stitching forums, people will generally use this term when showing pictures of their current work.
WOCS
This is an abbreviation for the World of Cross Stitching magazine.
Well I hope this jargon buster has been helpful and will help you break through the jargon and get to the real meaning at the bottom.
Thanks for reading and stay stitchy! x x x
A big gift...slow start!
Hi Guys :)
Well I haven't had much time to stitch this week due to how sleepy I have been! Working in London (when you come from Scotland) can be quite a pain and this week I have really felt it.
This week I have been working on a present for my boyfriend. It is a very large piece and I am making very slow progress! There is a lot of confetti stitching and due to the fact that I am working on black aida, some of the colours make it very difficult to stitch.
The piece is a Star Trek piece (as my boyfriend and I love Star Trek!) and it is a picture of the Voyager ship with 7-of-9 beside it. It is an extremely large piece measuring 21" by 14" which is a massive 300 x 200 stitches (60000 stitches!) Now this is probably small to some but it is massive to me! I know that some HAED designs can be a lot bigger than this but for me this is the biggest work I have ever done!

This is my progress so far. I still have a lot to go but it is coming on in leaps and bounds. My boyfriend thinks i'm 'getting there' but I had to explain the design is roughly ten times her actual head!

This is how the design will look when it's finished. As you can see, it's a lot of dark blues on a black background. Not great, but I am sure I will be happy with the finished look!
For anyone who is interested, I got the chart from:
http://www.angelfire.com/trek/spacebaby/Cross_Stitch/Star_Trek_Voyager_page2.html
The website is pretty good but I have only used them once. Just wanted to point out as well that I am in no way affiliated with this website! This is just something that I have used in the past and, if you are interested in this type of cross stitch, it is a good website to explore.
Also my threads have come from ebay. I order for a number of thread suppliers so not exactly sure where I got these ones from!
Anyway, I hope you have liked a look at my progress and I hope to put another few blogs up in the coming weeks.
Thanks for reading and stay stitchy! x x x
Well I haven't had much time to stitch this week due to how sleepy I have been! Working in London (when you come from Scotland) can be quite a pain and this week I have really felt it.
This week I have been working on a present for my boyfriend. It is a very large piece and I am making very slow progress! There is a lot of confetti stitching and due to the fact that I am working on black aida, some of the colours make it very difficult to stitch.
The piece is a Star Trek piece (as my boyfriend and I love Star Trek!) and it is a picture of the Voyager ship with 7-of-9 beside it. It is an extremely large piece measuring 21" by 14" which is a massive 300 x 200 stitches (60000 stitches!) Now this is probably small to some but it is massive to me! I know that some HAED designs can be a lot bigger than this but for me this is the biggest work I have ever done!
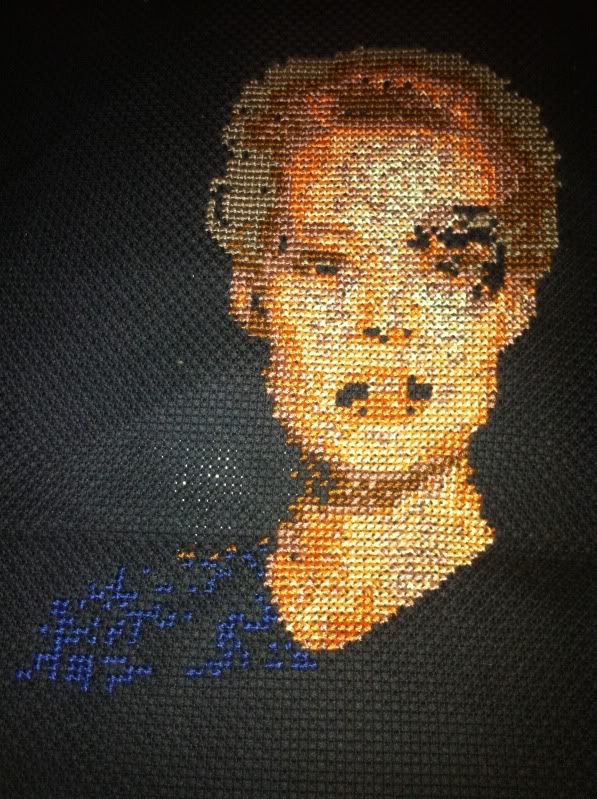
This is my progress so far. I still have a lot to go but it is coming on in leaps and bounds. My boyfriend thinks i'm 'getting there' but I had to explain the design is roughly ten times her actual head!
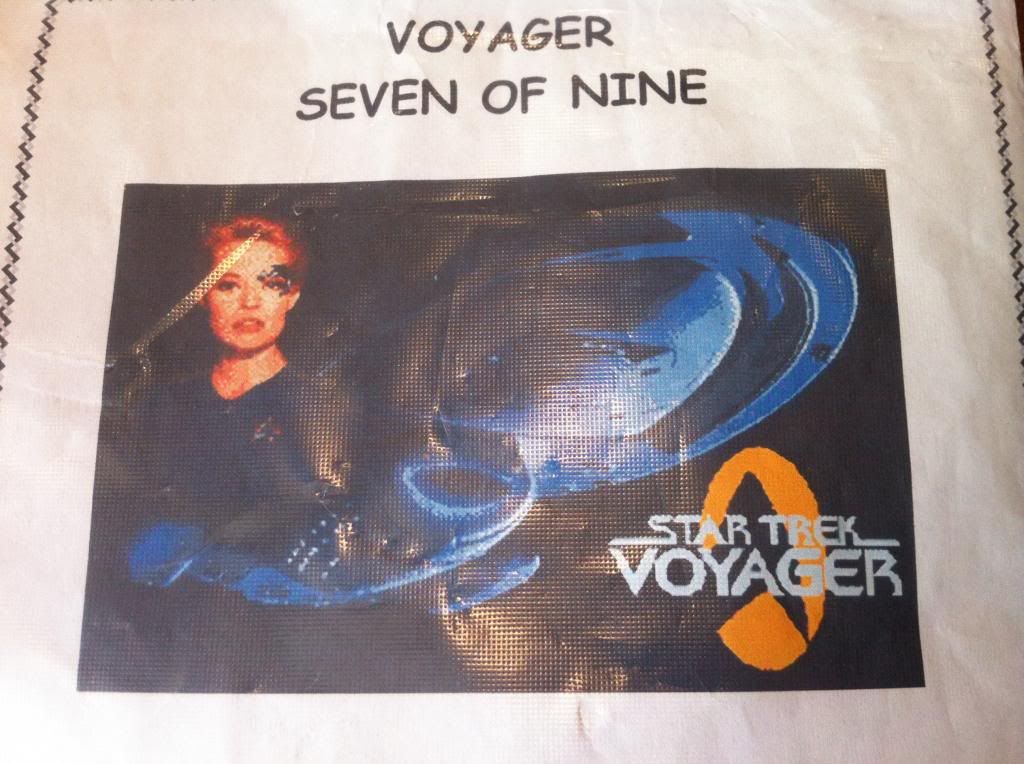
This is how the design will look when it's finished. As you can see, it's a lot of dark blues on a black background. Not great, but I am sure I will be happy with the finished look!
For anyone who is interested, I got the chart from:
http://www.angelfire.com/trek/spacebaby/Cross_Stitch/Star_Trek_Voyager_page2.html
The website is pretty good but I have only used them once. Just wanted to point out as well that I am in no way affiliated with this website! This is just something that I have used in the past and, if you are interested in this type of cross stitch, it is a good website to explore.
Also my threads have come from ebay. I order for a number of thread suppliers so not exactly sure where I got these ones from!
Anyway, I hope you have liked a look at my progress and I hope to put another few blogs up in the coming weeks.
Thanks for reading and stay stitchy! x x x
Subscribe to:
Posts (Atom)